The WordPress REST API is an essential part of the WordPress core that allows developers to turn WordPress into a modern, dynamic platform. With the WordPress REST API, you can easily build custom integrations with WordPress, allowing you to connect your site to a wide range of external services and applications. This can include anything from custom mobile apps to CRMs, social media platforms, and more.
In this article, we’ll dive deep into the WordPress REST API, explaining how it works and providing a beginner’s guide to using it. By the end of this article, you’ll have a solid understanding of the WordPress REST API and be ready to start using it in your own projects.
What Exactly Is The WordPress REST API?
Before we can fully explore the concept of a REST API, it’s crucial to have a foundational understanding of APIs in general. An API, or Application Programming Interface, is a way for different software applications to communicate with each other.
This communication is facilitated through a set of predetermined guidelines and standards that allow the exchange of data and functionality between the applications. APIs can be used by a variety of different types of software, including websites, mobile apps, and web apps.
Think of an API as a mediator or go-between, facilitating communication and exchange between different software systems just like a waiter connects guests and chefs in a restaurant. APIs act as the intermediaries that enable integration and cooperation between diverse applications.
The WordPress REST API is a specific implementation of an API that allows developers to interact with WordPress sites remotely and exchange data in the form of JSON (JavaScript Object Notation).
This API uses the REST (Representational State Transfer) architectural style, which defines how data is transmitted between software systems over HTTP (Hypertext Transfer Protocol).
The WordPress REST API allows developers to create, read, update, and delete content, as well as manage and organize their WordPress site, all from external applications. By using the WordPress REST API, developers can leverage the functionality and data of WordPress in their own custom applications, rather than building everything from scratch.
For example, you could use the Google Maps API in your website to include all of Google Maps features without having to create your own mapping application.
REST, or Representational State Transfer, defines standards for web systems to communicate with one another. Without REST, two systems would be unable to communicate and send data back and forth.
To be RESTful, an application must adhere to five principles:
- Uniform interface – A uniform interface is a key characteristic of a REST API. This means that the URL used to access the system must be consistent and follow a predictable structure, allowing it to be easily accessed using a common method such as GET. This uniformity allows for easier integration and communication between different software systems.
- Separate server and client – In a REST API, the server and client are designed to be separate and evolve independently of each other. This allows for flexibility and allows each component to be updated and modified without affecting the other. Additionally, the API itself is designed to remain unchanged even if the server undergoes changes, ensuring that the application can still be accessed in the same way.
- Server state remain unchanged – One of the principles of a REST API is that the server state should remain unchanged with each request. This means that when a new request is made through the API, the server does not need to save any information from the request and remains in its current state. This allows for greater efficiency and scalability of the system.
- Caching – Caching is an important aspect of a REST API to ensure high performance. This means that all resources within the system should be cacheable, both on the server and the client side. By allowing resources to be stored temporarily in a cache, subsequent requests for those resources can be fulfilled more quickly, resulting in improved performance for the overall system.
- Layered system – A REST API is often designed as a layered system, with multiple layers separating client requests and server authentication. These layers may include security measures, a cache to improve performance, or other additional functions. This layered structure allows for greater flexibility and modularity within the system.
The WordPress REST API is a powerful tool for integrating WordPress with external applications and servers. It allows developers to use JSON to exchange data and functionality with WordPress sites.
To take full advantage of the WordPress REST API, it is helpful to have a basic understanding of WordPress, JavaScript, and JSON.
The Advantages of The WordPress REST API
There are several benefits to using the WordPress REST API for WordPress:
- The WordPress REST API helps to modernize the appearance and user experience of WordPress. One example of this is the Gutenberg Editor, which utilizes the REST API to provide a more intuitive and visually appealing interface for content creation.
- Become a more universal connector for various programming languages.
- Simplifying system standards makes WordPress development more flexible.
- Developing a WordPress website has become straightforward with the simple integration of content.
- Obtaining a diverse set of applications for use on WordPress has become simpler.
How The WordPress REST API Works
Prior to WordPress 4.4, you had to use a plugin to access the WordPress API. However, the WordPress REST API has now become an essential component of WordPress.
To access the REST API, you can use one of four HTTP methods, namely:
- GET — Obtaining information from the server. When you visit the WordPress login page, your browser will send a GET request to the server. The server will then use the API to process it.
- POST — Sends information to the server. For example, after successfully logging into the WordPress admin page, you will make a request to enter data in the form of an article post.
- PUT — Used to edit and update existing data. For example, when you want to change your password.
- DELETE — Can be used to delete information. For example, if you want to delete a WordPress admin account.
A Beginner’s Guide To Using The REST API
In this guide, we will use the Windows Command Line Interface (CLI), PuTTY. You can launch Terminal on MacOS and Linux.
As a first step, use the SSH command to copy your server’s IP address. However, we recommend that you use a demo WordPress site or localhost. If an error occurs, so that it does not interfere with your main website.
1. Understand The Fundamental REST API Commands
In this guide, we’ll use the following REST API commands:
- Routes & ENDPOINT: Routes are URLs that can be mapped to various HTTP methods. While endpoints are HTTP connections. For instance, /wp-json/ contains all of the routes and endpoints.
- Request: used to store and retrieve information from a WP_REST_Request code.
- Responses: This command returns the data you requested or the location of the error message. This way, you can pinpoint the source of the error.
- Schema: The schema displays a list of properties and input properties that the REST API can accept and return.
- Controller classes: this command is used to manage your REST API.
2. The ENDPOINT Command Explained
In this REST API guide, we’ll show you some ENDPOINT REST APIs that you can try out.
To begin, open your browser and enter the following URL to invoke the HTTP to REST API:
http://Your_Domain_Name.com/wp-json/
Next, you can test the connection by using the following command and typing ‘curl’ into your command prompt.
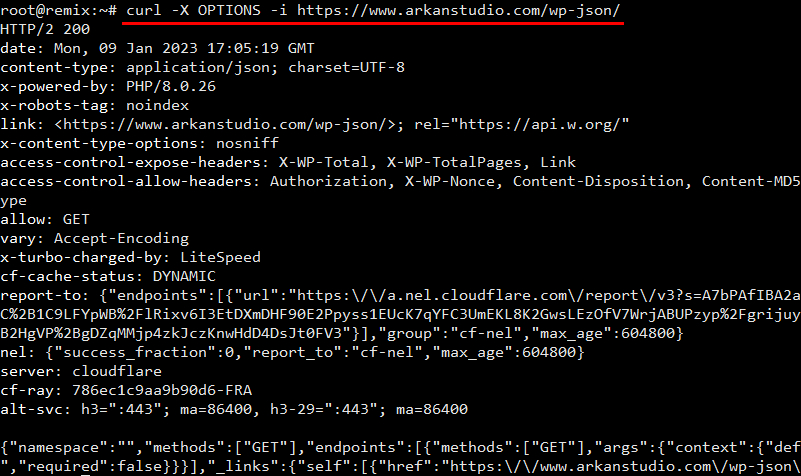
curl -X OPTIONS -i http://Your_Domain_Name.com/wp-json/
The above command produces an HTTP message display that looks like this:

You can also use multiple ENDPOINTS to repeat this command.
We’ll use curl’s GET command this time to retrieve a list of JSON files from your WordPress post. You can use the following command to perform a GET command:
curl -X OPTIONS -i http://yourdomain.com/wp-json/wordpress/v2/posts
You can also use the following command to check all of the pages on your WordPress website:
curl -X GET -i http://yourdomain.com/wp-json/wp/v2/pages
3. The REST API Authentication
The data in the WordPress REST API is available to the public. While some WordPress sites require you to be logged in as a WordPress administrator.
To resolve this issue, you must first authenticate your WordPress account with the server.
As an administrator, you should be able to make any request. Viewing unpublished content or making website updates are two examples.
In this tutorial, we will use the WordPress REST API Plugin – OAuth. This is a developer-only plugin that will help you learn about REST APIs. However, this plugin is not intended for live or online websites.
Here are the steps:
Enter your WordPress dashboard and navigate to the Plugin menu > Add New > search for the “WP REST API – OAuth” plugin.
Then click Install and Activate.
After installing the WordPress REST API, launch the CLI and log in with your WordPress user. Here’s an example of how to use curl to view unpublished posts and implement the user authentication method.
curl —user username WordPress:Password WordPress -i http://yourdomain.com/wp-json/wp/v2/posts?status=draft
Second, after selecting the post ID, enter the following command, adding the post ID at the end of the curl command:
curl -X GET -i http://yourdomain.com/wp-json/wp/v2/posts/ID
You can use the above command to select the ID of the post, category, page, comment, etc. given by the ENDPOINT for the WordPress REST API.
4. Finding Blog Posts Using the WordPress REST API
Now you understand how to make requests to the REST API using the curl command. So, you can proceed with how to select specific WordPress posts using some of the following commands.
First, view all posts on your WordPress site using the following command:
curl -X GET -i http://yourdomain.com/wp-json/wp/v2/posts
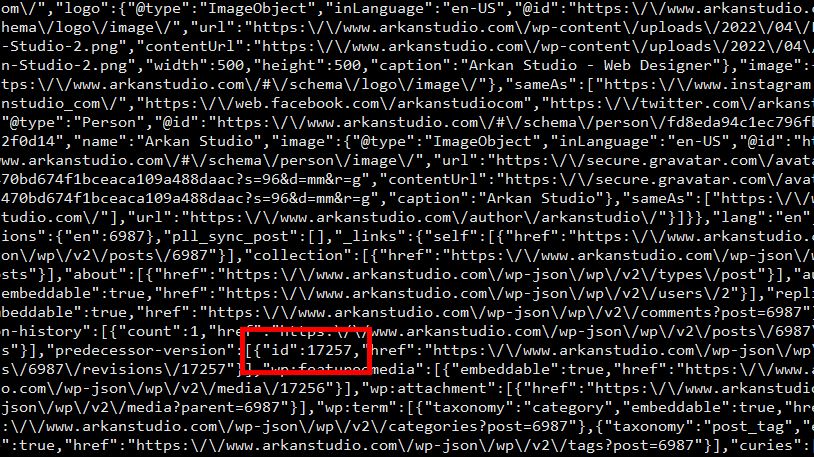
Then, you will be given a JSON view like the image below. Just choose one of the post IDs that you will see.

After selecting the post ID, execute the following curl command by appending the post ID to the end of it:
curl -X GET -i http://yourdomain.com/wp-json/wp/v2/posts/ID
The ENDPOINT for the WordPress REST API can be used to select the ID of the post, category, page, comment, etc. using the above command.
5. Using REST API To Update Post Title
The posts on WordPress will then be updated using the REST API.
Using the POST command, we will try to change the name of the article title in this guide. So, remember to include the article post ID in the POST command!
Then, on the command line, enter the following command. Don’t forget to change the post’s ID and the title of the article.
curl -X POST —user username WordPress:password WordPresss http://yourdomain.com/wp-json/wp/v2/posts/IDPost -d "title":"New Blog Title"
After that, double-check that you successfully changed the title of the article by using the post ID you chose. The trick is to use the following command to verify the post ID:
curl -X GET -i http://yourdomain.com/wp-json/wp/v2/posts/PostID
And… well done! You’ve mastered the fundamentals of using the WordPress REST API. If you want to learn even more, check out the REST API documentation.
Conclusion
The WordPress REST API offers a variety of benefits for WordPress websites, including the ability to modernize the user experience and simplify development. It’s clear that the REST API has numerous advantages for WordPress users and developers alike.
The WordPress REST API not only enhances the features and content of WordPress websites, but it also simplifies the development process.
With the REST API, developers can easily add advanced features and functionality to WordPress, making it more user-friendly and efficient. By utilizing the REST API, developers can enhance the overall usability of WordPress sites.
We hope this basic guide will provide an understanding of how the WordPress REST API works and how to use its commands on your own website.
